Banner
Showing posts with label tips. Show all posts

Thursday, March 14, 2013

How to Create Windows 8 live Tiles for Android with Best Free Android Apps


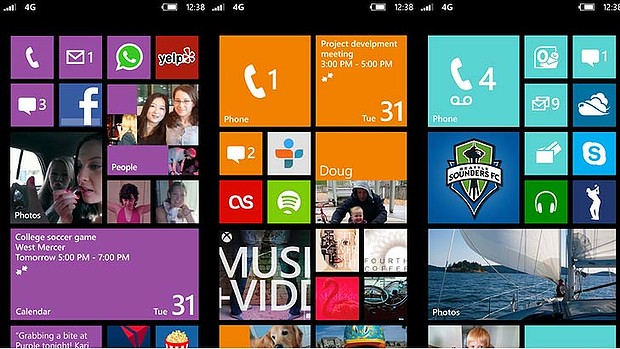
Windows Phone 8 Live Tile

Relying on Nokia and HTC, the newly Window Phone 8 OS from Microsoft has been successfully known around the world, but Windows phone still can't make a mark in the smartphone market! Luckily the Windows 8 live Tile has won lots of praise from mobile users! Some Android users want to get such Windows live tiles on their Android devices.

If you are also interested in those Windows 8 Live tiles and bored of Android's user interface, why not creating those live tiles now on your Android phones and tablets? We have rounded up best two free Android apps to help Android user create Windows 8 live tiles on Android. Just take actions to download the following Windows Live Tile apps and beautify your Android!

Tile Launcher

This Android app brings basic smooth Windows live tiles to Android devices, but users get many choices to customize their own live tiles.

Windows Live Tile on Android - Tile Launcher

Windows Live Tile on Android - Tile Launcher

Feature:

Scrolling – Users can select horizontally or vertically. And it allows you to specify Scroll Settings for scrolling speed, direction, and overscroll effect.

Tile Customization – You can easily select your own title, icon, background colors or images.

Snap Effect – If you need snap effects, it will perform an action, switch screens or open the drawer when overscrolling.

Lock Desktop – It supports to lock your desktop to prevent accidental changes.

Toolbar – this is a unique feature! You are allowed to choose font, colors, icon, and even show a Jellybean-styled date widget!

Note: The Tile Launcher apps are free available on Google Play and runs on Android 4.0 and above! In addition, if you want more special effects for sliding drawer and Tile Appearance, you can purchase its Tile Launcher Pro Key to activate its Pro version.

Launcher 8

It is the most favorable app for creating Windows 8 live tiles. You will be surprised to get more options on tile size, color and more!

Windows Live Tile on Android - Launcher 8

Windows Live Tile on Android - Launcher 8

Feature:

Tile – You can choose different sizes, various colors and even add Android widgets.

Theme and Background - More than one hundred kinds of theme colors can be selected. You can save and restore the theme and set background style.

Screen - You can edit the start screen layout and set the WP8 style lock screen.

Application list - it allows to switch the style of the app list.

More – with permission, it can help you show the shortcuts of Live contact and SMS

Note: The required Android version is 2.2 and up! So it can run on most Android smartphones and devices!

More Android tips:
Top Five Android Office Apps You Shouldn’t Miss!
Top Free PDF Readers Android Users Should Own 
How to Recover Deleted Files from Android Devices on Mac
Android Tips: How to Back up Your Android Devices Data Freely and Safely
Top Free Android Apps You Should Own to Change Your Voice
How to Play Flash on Android 4.1 Jelly Bean


Wednesday, March 13, 2013

How to Locate a Cell Phone with Google Maps

how to locate a cell phone with Google maps

As the mobile technology develops rapidly recent years, our cell phones are not just communication tools and are more and more important for our working and daily life! We usually save contacts, E-mail, messages, photos, personal notes and even business files into cell phones. If our phones were lost or stolen, that would be a disaster. As a result, it is necessary to know how to locate a cell phone. In addition, if we can track the location of cell phones, it would be easier and more convenient to know where our family and friends are. Now let's learn how to locate a cell phone with Google Maps in detailed steps!

What we should know:

1. Except Google service, we still can locate our cell phone with other free apps, such as Foursquare, Facebook's "Check In" feature; Find My iPhone app, or some Anti-virus apps. For Windows Phone, we can visit the official Windows Phone website to track our stolen Windows Phone device with "Find My Phone" feature. 

2. Concerning about safety issue about other data in cell phone, it is better not to install free unknown apps for locating a cell phone. Google Maps offers two main ways to trace our cell phones with GPS, and all the services are free and safe!

3. In case of unnecessary troubles, please back up your phone often. By the way, after missing for a period, your phone may lose some data, and you can use a third party tool to recover your data.

Locate a Cell Phone with Google Latitude

Google Latitude

The Google Latitude is a new feature of Google Maps to offer location-aware service. With Google Latitude, you can see the exact location of your family and loved ones. For privacy, you can decide which friend can see your location and turn off the location. Of course, it is easy to help you find out the location where your lost cell phone is.

Step One: Download and install the free Google Latitude app in Google Play, or go to the Google Latitude website on the computer.

Step Two: Sign up, log in with a Google account, invite your friends to join the Latitude. If they sign up, you can trace their location in real time. You can go to Privacy Settings and decide the friends that you want to share your locations with.

Step Three: If you lost your cell phone, you can go to the Latitude website and find the location of cell phone in Google Maps. By the way, you can tell your friends who use Latitude to help you trace your cell phone in Google Maps.

locate cell phone on Google Latitude


Locate a Cell Phone with the "Click-to-call" Feature of Google Maps

Step One: Go to Google Maps and search for any business such as a Chinese restaurant.

Step Two: Click the "Call" link next to the Google maps search results for the Chinese restaurant. Enter your cell phone number and Google will call the number. Then the location of cell phone will show up on Google Maps.


More Tips to Locate a Cell Phone:

1.    wheresmycellphone.com
Go to this website, enter your cell phone number, and then the website will call your cell phone.

2.   IMEI
IMEI number is a unique finger print of a cell phone and can be found underneath the battery. If your cell phone was lost, just tell your cell phone company to help track your phone by the IMEI number.


Tuesday, January 15, 2013

Android Tips: How to Back up Your Android Devices Data Freely and Safely

How important is the data in your Android devices for your daily life or working? You may not have the habit of backing up data. However, your important data like photos, videos, apps and contacts could be lost since others and you might delete them accidently or your Android devices were lost unfortunately. In addition, it is better and safer to back up data before updating OS! So it is worthy and necessary to know some methods to make a backup of your data in Android devices. Here we simply share with you some free and safe ways to back up data locally and online, even with back-up apps.  

back up your data on android phone

 
Back up locally and traditionally

The most simple and traditional method of Backing up data should be to save your photos, music and other SD card data into your computer or other mobile hard disks. Just connect your Android device to your computer and access your device’s memory and SD card, then copy all data over to a folder on your computer!

Back up online with Google account

If you save your data online with Google account, you can access to contacts, system settings, apps, calendar and email data whenever and wherever, even with a new Android Phone! Go to Settings > Privacy, and check the boxes for "Back up my settings" and "Automatic restore", then the last thing is to specify your Google account where you desire to back up data. Simply go to Settings > Accounts and sync, open your Google account, and check all available options. With these settings in place, your contacts, system settings, apps, calendar, and e-mail will be restored on the Google account!

By the way, as for photos and videos, you can upload automatically with Google’s Instant Upload service. The data uploaded is invisible by others and you can easily share online! What you should do is to sign in, go to Menu > Settings to enable Instant Upload service!


Backing up with apps

Backup of photos. With the help of some free picture apps such as Flickr Companion and Picasa Tool, you are allowed to upload and save photos from your Android devices to your account on their websites!

Backup of text messages. SMS Backup+ is a popular and free app helps you automatically back up SMS, MMS and call log entries using a separate label in Gmail / Google Calendar.

Backup of all kinds of data. If you want to make such backup for all data like your Apps, Photos, Music, Videos, Contacts, Call log, Browser Bookmarks, SMS (text messages), MMS (message attachments), Calendar, System Settings, Dictionary, Music Playlists and more, it is recommended to use professional backup tools. MyBackup is such kind of app with free and $4 paid version. With this app, you can select certain apps or all apps to back up and make a backup on the schedule. All data could be easily saved as a ZIP file on your SD card or on their online server.

More tips for you:

Google Play Tips: Tips before Buying An App and Requesting Refund!
Jelly Bean Tips - How to Play Flash on Android 4.1 Jelly Bean
How to Install Google Play Store on Amazon Kindle Fire HD 7'' 
Top Free Calling iOS Apps to Help You Call for Free with iPhone, iPod touch and iPad 
Best iPhone and iPad Apps to Keep Our 2013 New Year's Resolutions

Friday, January 11, 2013

Google Play Tips: Tips before Buying An App and Requesting Refund!

For Android users, searching for apps in Google Play may be a common thing they do in daily life! Sometime you can’t decide whether buying a new app or not, and unluckily the newly installed apps couldn’t satisfy them and bring troubles to your Android devices! To save unnecessary money, you need to know what to do before purchasing an app and even how to returning the app and request refund from Google Play or Developers!

Google Play

What you should do before buying an app from Google Play?

Focusing on features between free and paid versions

This is a most important part before buy an app, but you should pay much attention on those key features of the app, especially different features between free and paid version. you may think an app is relatively cheap and is worthy to buy. However, for some free apps, you'll find that the only difference is that they are ad-supported. Upgrading to full version will remove the ads and nothing else. In addition, some apps with full version will provide some key and extra features, but actually the free version has met user’s need!

Similar apps from different developers

If you are a loyal fan of some developers, it is not necessary to comparing similar apps from different developers since you believe in those developers and are familiar with their user interface! But, if money and factions are the only things you care about, you should compare those apps from different developers, and you will find cheaper and useful app!

Check comments from review, feedback and social media options

If you are still not sure whether to buy an app, why not search and get more comments from other old users. You can just read the users review or feedback on Google play. In addition, if it is still a little expensive for you, you also can ask options from social media users by means of just input the app’s name into Facebook or Twitter.

Sales promotion!

You may be so lucky to find the sales promotion of this app in Google Play. However, we all know that Amazon has its own Android app market, and you will find more promotions from the same developers. By the way, some sites such as FreeAppADay and AppShopper also run free giveaway for some apps every day!

Returning apps and get your money back

A full refund within 15 minutes from the time of download

Some Android users may not know that Google Play allows users uninstall and get a full refund within 15 minutes from the time of download. During the 15 minute return period, users can find a 15 minutes refund window in the Google Play Store app from devices. The other method is to log onto your account from web browser, select My Order & Settings in the bottom of the page and choose Report a problem by closing to the app you want to return.

Refund from developers after the 15 minutes ends

When you scroll down the page of the app in Google Play, you will find the detailed information about the developer, like email address, phone number and social networking account. Just contact the developer and ask refund. What’s should mentioned is that not all refund reasons work and they still have the right of final explanation whether approving your refund or not. So before contacting them, you should make sure you got an eligible enough issue for the refund, like freezing your device after installing!

The above tips are some practical but personal options, and some users may have known those tips early. Good luck for you and may you save more money! 

Wednesday, January 9, 2013

How to Copy Music from iPod to PC for Free

We like to listen to music with iPod, and we are also used to saving our music on our PC since we sometimes want to listen to those music on PC. However, Apple doesn't allow contents from its devices accessible on computer. As a result, a free and safe solution spreads on internet!

Now we will tell you how to copy music from iPod to computer steps by steps! If you think it is a little complicate for you and you don't want to change some settings or options mentioned below every time just for copying some music, it is considerable to use third-party software to deal with it! For example, Leawo iTransfer is such a good transferring tool which will help you easily and fast transfer music, video, photos and apps between iPad/iPhone/iPods and iTune/ PC just by means of drag-drop files you desire to transfer.

How to Copy Music from iPod(iPod Nano, Shuffle and Classic) to PC

Step 1: Connect your iPod and run iTunes. To put your iPod into disk use mode, you need to make sure that the "disk use" has been enabled in iTunes. In the iPod management of iTunes, go to "Options" and check "Enable disk use". iTunes will give you a warning--select OK.

Step 2: Open My Computer and open your iPod drive. Open Tools at the top of window and then select Folder Options. Click the View tab and check "Show hidden files and folders".

Step 3: Now in your iPod folder, open iPod_Controls and then Music folder. Highlight all of the folders and drag them into the desired folder on your hard drive of PC.

Step 4: Highlight all of the folders again, right-click, and select Properties. Uncheck "Hidden". Close this window.

Now the music has been successfully transferred from iPod into PC. After you import the music into iTunes (or any other media player), you can listen to favorite music on PC.

More tips for you:
 

Tuesday, November 27, 2012

iPhone 5 Tips - How to Transfer Videos and Music from iPhone 5 to Computer

As the latest Apple phone, iPhone 5 features with more updates to improve users experience, such as longer and thinner display, faster wireless, powerful A6 chip and latest iOS 6. However, there is a problem facing iPhone 5 users and so do users of other iOS devices like iPad mini, that is to transfer files between iPhone 5 and PC. You may be allowed to transfer photos, music and movies from PC to iPhone 5 with iTunes. But when you want to transfer those files from your iPhone 5 to computer, then trouble comes, since that you are only allowed to transfer those items purchased from the iTunes Store or photos captured with iPhone 5 camera. In other words, you can’t transfer items downloaded from other resources!

Sometimes you want to transfer some data to computer for backing up or watch or edit videos on computer! So here we will tell you how to transfer videos and music from iPhone 5 to computer, no matter whether them are purchased from iTunes or not!

Method One: Transferring with iTunes and iCloud

This method is for transferring those purchased videos and music from iTunes.

With iTunes

1.   To make sure to authorize your computer before connecting iPhone 5, follow the steps ("Store"menu, choose Authorize Computer and enter Apple ID and password).


2.      Connect your iPhone 5 to the computer.

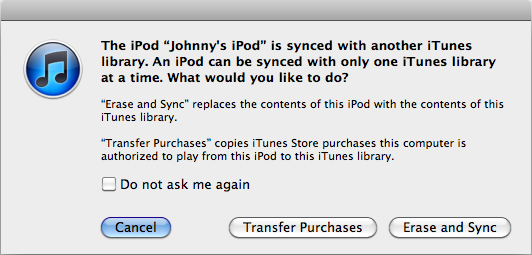
3.       Click the Transfer Purchases button.
You can right-click (Windows or Mac) your device in the iTunes Source list, then choose Transfer Purchases from the shortcut menu that appears.

transfer with iTunes

If you connect your iOS devices for the first time, one dialog may appear automatically as follow , you just click the Transfer Purchases button.

Transfer purchase with iTunes

With iCloud

iCloud is a wonderful service for sharing or backing up your data, so you also can transfer videos and music with it. First of all, you should share your data onto iCloud. Then you need to download from iCloud again to computer. In addition, it requires lots of wireless data to finish the process. So if transferring with iCloud, you have better make sure the Wi-Fi is available for your iPhone 5.


Method Two: Transferring with iTransfer

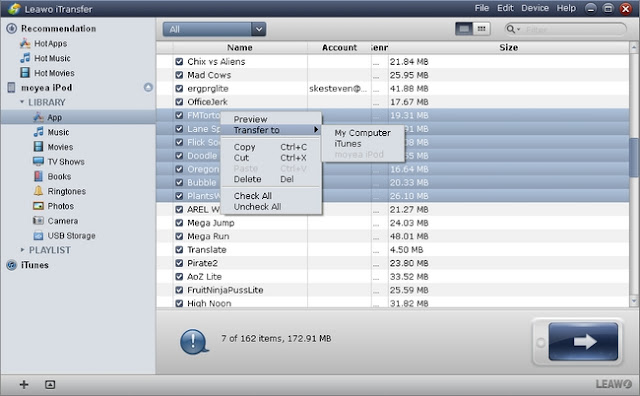
iTransfer is one third-party application run on Windows PC to transfer data between iOS devices, iTunes and computer. With this professional transferring tool, you don’t need to worry whether your movie and music are purchased from iTunes or not! And it is developed for transferring data between your iPhone 5 and computer with a fast speed and easy steps!

1.       Download and run LeawoiTransfer, then connect your iPhone 5. Your phone will show up in the left list.

2.       Select those videos and music you want to transfer, in "Music" and "Movie" of the library of your iPhone 5.

3.       Directly drag-and-drop those data to your computer or right click and choose "My Computer" in the drop-down menu of "Transfer to", even you can directly click the "Transfer" button to transfer fast.

Leawo iTransfer


What should be mentioned is that the iTransfer takes iOS devices as flash disk, and can read all kinds of data in the devices. As a result, iTransfer can not only transfer videos and music but also all photos and apps from iOS devices to PC or from PC to iOS devices!

More tips for iPhone 5:

Data Recovery Tips: How to Recover Deleted Files for iPhone 5
Top Tips for iPhone 5 and iOS 6: Google Map and Battery Life
iPhone 5 Tips: How to Watch DVD on iPhone 5

Tuesday, October 9, 2012

iPhone 5 Tips: Best Free iPhone Apps – October 2012

The iPhone 5 has been available on market for a short time, and most iPhone 5 owners must have been proficient in the new iPhone. Now why not getting more iPhone apps to play and enjoy with the new CPU and iOS? Here we recommend some best free iPhone apps in October for you!


If Microsoft Office is part of your daily work routine. You don’t want to miss Smart Office 2.
Creating, editing and sharing Microsoft Office and other documents on the go will be even easier with Smart Office 2. You even can convert Microsoft Office files into a PDF file or simply save your documents in their office file format and share to cloud services like Dropbox and Google Docs. Besides, printing function is included. You can print immediately to thousands of wireless printers including HP, Epson, Canon and Samsung.

Smart Office 2 - iPhone 5 app


Most people know the powerful Photo Editor Photoshop, but it is cost and a desktop program. Now the highly effective mobile editor has been fully optimized for your iPhone 5. AnyShape
is will allow you to create just about any shape imaginable in seconds and use it for irregular shape cropping, selective filtering, and selective colorizing. And it is equipped with 20 awesome filters and 15 professional enhancement tools. 


StickBo Zombies is a zombie hunting game starring a stick figure hero, and you’ll get to use whatever weapons at your disposal to your advantage. You can choose from a ton of weapons, engage in all out, nonstop action with bloody effects, and enjoy fun, comical graphics and animation.

Tuesday, September 25, 2012

iPhone 5 Tips: How to Watch DVD on iPhone 5


iPhone 5 has come to your hand and you can play it with its larger screen. Featured with a resolution of "1136x640" and brand-new chip A6, iPhone 5 has no doubt become your powerful multimedia tool. You can enjoy more HD movies and videos now, but how to play DVD on iPhone 5. We can’t ignore the fact that there is no DVD driver and DVD-Related apps compatible with iPhone 5. So it is better to convert DVD to video for iPhone 5 with a DVD Converter. Google DVD Converter and you will find many of them. Now the following guide will show you step-by-step converting DVD for iPhone 5.

Here we take sample of Leawo DVD Ripper because it is my personal preference and the Ripper is actually easy to use.

Step 1: Download and install DVD Ripper, which is designed to convert DVD for iPhone 5. Then open it and you will find four simple steps at the main interface.

Step 2: To import the DVD file by click "Load DVD" button at the upper-left corner or choose "Load DVD" option in the drop-down menu of "File".

DVD Ripper load DVD


Step 3: Specify the output file as a MP4 video or iPhone video in the drop-down menu of "Profile". It is better to convert DVD to MP4 video based on the fact that only MP4 video and MOV file is supported by iPhone 5 and MP4 video can also be played on other devices.

choose the video format for iPhone 5


Step 4: Further settings for the output video. Just click "Settings" icon to enter Settings panel where various video parameters are provided for customizing including Video Codec and Video Size. For example, you can set video size as "1136x640" to take advantage of its high screen resolution and video codec as "H.264" for iPhone 5.

settings for output video


Step 5: Start the conversion for iPhone 5. Now click Start button to begin the conversion from DVD to MP4 for iPhone 5. As the conversion ends, you can play DVD on your iPhone 5 easily.

start the conversion for iPhone 5


Other Tips: if you need and want to edit the DVD files and make it fit for you and your family. Following two tips can be for your reference. 
  1. To edit the output file. Click "Edit" icon on the top of interface to enter Video Edit panel where various editing features are provided. You can polish the output video with "Trim", "Crop", "Effect" and "Watermark" tabs.
  2. 3D Effects. Click "3D Settings" icon near the "Edit" icon to enter corresponding panel. Then you can choose one 3D effect and adjust 3D depth with corresponding bar.
With one DVD Converter on your hand, there is no need of DVD Player and DVD Driver at home and you can share DVD movies with friends outdoor.

iOS 6 and iPhone 5 Tips: More Tips for Using iOS 6 and iPhone 5 Better

iPhone 5

The Apple’s brand new operating system, iOS 6, is finally available to download and many Apple fans have got the new iPhone 5 in the palm of their hands . Now it is time to learn new features of iOS 6 and get started to play with your iPhone 5 and other iPhones and iPad. You will find that performance and design of iOS 6 and iPhone 5 are still great and more user-friendly. Here again will tell you some tricks to take advantage of iOS 6 and iPhone, as a supplement for the previous article related to iOS 6 tips.

If your iOS devices are still running the previous iOS, here is the link to show you how to install iOS 6.

1. Do Not Disturb

This is a useful and great feature of iOS 6 to customize your notifications and help you from being disturbed during meeting and other important time. You can completely silence your iPhone and iPad on demand and on a schedule. But you can also make exceptions to be sure that you won’t miss any important phone calls.

How: Settings > Notifications > Do Not Disturb.

2. Reply politely to incoming calls with a text message
 
If an important call comes in and you are not available to answer that, now the iOS 6 offers you a polite way to deal with it. You can reply with a text message instead of declining the call. Of Couse you can also change the default replying texts and edit on your need.

How: Settings > Phone > Reply with Message.

3. Smarter Siri
 
Most of users have heard some new functions with the voice assistant Siri in iOS 6. Siri is now able to launch apps, answer questions about sports, find nearby restaurants and even make reservations, and even provide directions where appropriate. Moreover, you can update your status of Facebook and Twitter.

4. Privacy Settings

What is it and what can it do for you? Generally speaking, if you allow before, you apps can talk to other apps, enter your data, and sharing your information. Sometimes this is what you don’t like. For example, if you don't remember to turn off Facebook, Facebook will tell others where you are. But now you just check the Location Services section of your Privacy buttons, and you can flip the switch off lickety-split.in other words, the new feature helps you quickly turn off any app-to-app sharing that you don't want and you might have forgotten existed. 

How: Settings > Privacy 

You can see which applications have access to personal information, such as location, and turn them on/off them 

5. Panorama Pictures

You maybe have complained that why Apple add Panorama mode behind from Android Devices. But now it comes into the iOS.

How: Move slowly from left-to-right and keep it steady.

Monday, September 24, 2012

iOS Data Recovery Tips: How to Recover Deleted Files from iPhone 5

iOS Data Recovery Tips: How to Recover Deleted Files from iPhone 5

Want to get back all files from iCloud and iTunes for you iPhone 5? Recover accidentally deleted or lost useful contents from iPhone 5? These are common problems for iPhone users. Actually, they are easy to deal with! The data, no matter deleted or formatted photos, videos, contacts and other files, will be recovered easily with the help of iTune, iCloud and Leawo iOS Data Recovery. Here we will show you three common step-by-step methods to recover 12 types of data for your iPhone 5.

Method One: Restore backup data from iTunes and iCloud.

As long as you've previously backed up your iPhone with iCloud or used iTunes as your iPhone manager, the following steps will work for you.

Recover from iTunes

Follow these steps to choose a backup and sync the data to your iPhone.

1. Connect the iPhone to the computer with a USB cable. And open iTunes.

2. If you have a new or erased iPhone, iTunes will prompt you to restore from backup. Otherwise, Control-click on your iPhone under DEVICES in the left menu.

3. Select Restore From Backup.

4. Choose the backup you wish to sync and click the Restore button.

Restore from iCloud

If you already have an iCloud backup, it's also very easy to restore your iPhone 5 from iCloud.

1. Your iPhone data can be restored from iCloud when setting up a new device, or after erasing all data from a device using Settings -> General -> Reset -> Erase All Content and Settings. You will be prompted by Setup Assistant by a new iPhone to set up as a new phone or restore from backup.

2. Make sure your iPhone is connected to Wi-Fi and plugged into the charger.

3. Select the option “Restore From iCloud Backup”.

4. Enter your iCloud account and password.

5. Choose the recent backup you wish to restore to your iPhone.
    Enter any passwords required when prompted.

6. You will see a progress bar as iCloud restores your data. When this is complete, iCloud will begin to download apps. Your iPhone should do this for you automatically. If you need a specific app first, tap its icon to move it ahead in the queue. To check if the restore is finished, navigate to Settings -> iCloud -> Storage & Backup.

However, not all iPhone users remember to back up their data to iTunes and iCloud. And the backup file from iTunes can't be viewed and it will erase all the contents of your iPhone when restoring. In addition, when restore data from iCloud, you can't restore parts of data selectively. So the best way is to get a recovery tool to help you to preview all the contents and restore them selectively.

Method Two: Recover data for iPhone 5 with Leawo iOS Data Recovery

Leawo iOS Data Recovery is the best iPhone/iPad/iPod touch data recovery program to recover lost Camera Roll photos, videos, contacts, messages, call histories and many more data from iPhone 5, iPhone 4S, iPhone 4 and many more models of iPhone, iPad and iPod touch. The following steps will show you how this tool can easily recover iPhone 5 data in several steps.

Step 1: Scan your iPhone 5
Connect your iPhone 5 to the PC and open Leawo iOS Data Recovery program, then you’ll see a Start button on the center of the program interface, just click it to start to scan your iPhone 5.

Start scanning your iPhone 

Step 2: Preview data found in the scanning
Once file scanning is finished, the lost files are found and are listed on the left side of the program. You’ll be endowed with the capability to preview all the files in different categories to find the exact files for recovery.

Preview iPhone SMS messages

Step 3: Recover and save iPhone 5 data
Select the files you want to recover then click "Recover" button. You need to select a path to save files and it is recommended to save the files on a familiar file location of your local computer instead of the default disk C. The program also facilitates fast opening of the recovered files by ticking “Automatically open the output folder after finishing recovery” checkbox.

Save SMS messages from iPhone 


Sunday, September 23, 2012

Top Tips for iPhone 5 and iOS 6: Google Map and Battery Life

Apple Map

The iPhone 5 is on your hand and iOS 6 has been updated for iPhone and iPad. Even though you love them, you have to admit that they also make some troubles to you, such as Apple Map, battery life. Thereby, we pick up some top tips to help you solve these problems.

Replacing Apple Map by Google Map on iOS 6

You may have complained the new Apple Map app so much, which has less, wrong information, and some terrible satellite photos. As we all know, the key point of map software is its richness and accuracy of data. To save your trouble, why not replacing the Apple Map by Google Map? Here is a useful video we pick from YouTube to tell you how to get Google Map back on iOS 6.


App: Tips & Tricks for iOS 6 and iPhone 5 - Video Walkthrough Secrets

This app, Tips & Tricks for iOS 6 and iPhone 5, is designed for both iPhone and iPad. You will get over 1000 unique iOS 6 tips and easy ways to master your iOS and iPhone 5. Most of the tips are step-to-step videos. We think it is worthy to own. Download it on iTunes.

App:tips for iPhone 5 and iOS 6


Extending the battery life of the iPhone 5

As Apple claims, iPhone 5 offers talk time of up to 8 hours on 3G and video playback of Up to 10 hours. But are you satisfied with it? No! So here we pick up some top tips to tell you how to extend battery life of iPhone 5.

1. Reduce screen brightness (browse to Settings > Brightness and adjust). There is also the option to set this on an automatic setting (browse to Settings > Brightness > Auto-Brightness On).

2. Turn off the functions and apps you don't use often.

Services like Wi-Fi and Bluetooth when not in use, turn off them and ensure Vibration Mode is turned off (browse to Settings > Sounds and set it to off).

Location Services (like Maps), when it is not in use, turn off (browse to Settings > Privacy > Location Services).

Turn Push Email function off, if not in use (browse to Settings > Mail, Contacts, Calendar > Fetch New Data and set Push Email to off).

3. Disable some default settings. Some apps use Push Notifications by default and this drains the battery. To disable, browse to Settings > Notifications and disable notifications for chosen apps.

4. Switch to Airplane Mode when low on battery or in an area with no network coverage (browse to Settings > Airplane Mode).

5. Keep iPhone away from direct sunlight and other heat sources.

 More tips for iPhone 5:

3 Ways to Play Flash SWF as HD Video on iPhone 5
iPhone 5 Tips - How to Transfer Videos and Music from iPhone 5 to Computer
Data Recovery Tips: How to Recover Deleted Files for iPhone 5

Tuesday, August 21, 2012

Best Tips to 3 Frequent Problems with Android Phones

 Android phones are so popular that some people around us certainly own one android phones, and they have become our essential part of our life. But accidently problems may come with our phones and bring us trouble, for example, water damage, battery life and data lost. As owners, we should have some ideas of maintaining your android phones. Here are some tips to three kind of frequent problems for your android phones.

android battery life

Boost Your Android Phone's Battery Life
As we know, the latest smartphones are thinner designed with less room for batteries, larger and brighter screens, faster dual-core processors, more software that runs in the background. Sometimes our battery life is used up to end, but we are in the habit of recharging it at night. So we need to expand the battery life for our android phones
     1. See what consume the battery!
Navigate to Settings > About Phone > Battery Use If you see an application you barely use or a feature you never use, uninstall the app or turn off the feature.
     2. Turn unnecessary hardware features off
Some like Wi-Fi, and Bluetooth are not necessary to be activated in 24 hours
     3. Set display brightness to adjust automatically

dry water from phones

Save your phones after water spilled or drunk into water
This situation happens often, but not all android phones are water proofed like Motorola Defy. The follow tips may help you to rescue your phone.
     1. Pull out the battery and SIM
     2. Leave it near sunlight for 24 hours or put it in a bowl of uncooked rice.
     3. Do NOT put your battery back until the 24 hours are up.

Leawo data recovery for mac

Recover data from your phones or SD card
We often delete some files to get more memory, but someday we find that the files deleted are important and we need them back. What should we do? Usually expecting accidental file formatting and deleting, our phones also face problems such as virus attack and power failure, improper operation, and these activities possibly cause our data lost. So we also have to know how to recover deleted files.
  1. Files deleted are still there and just invisible. We should stop saving new data into the original area in case of files overwritten.
  2. Connect your phones to PC and run one data recover software. Leawo Data Recover for Mac is one of best programs I have used so far and it can help to recover all data lost from hard drive and storage devices
  3. Scan and recover your files.

Related Posts Plugin for WordPress, Blogger...